Programming Examples
Arduino program to Design a night lamp using a photodiode and a LED and find out the time delay associated with turning the lamp on and off.

Arduino program to Design a night lamp using a photodiode and a LED and find out the time delay associated with turning the lamp on and off.
Designing a night lamp using a photodiode and an LED with an Arduino Uno involves several steps, including wiring the components, writing the Arduino code, and measuring the time delays. Here is a detailed guide to help you through the process:
Components Needed:
- Arduino Uno
- Photodiode
- LED
- 220-ohm resistor
- 10k-ohm resistor
- Jumper wires
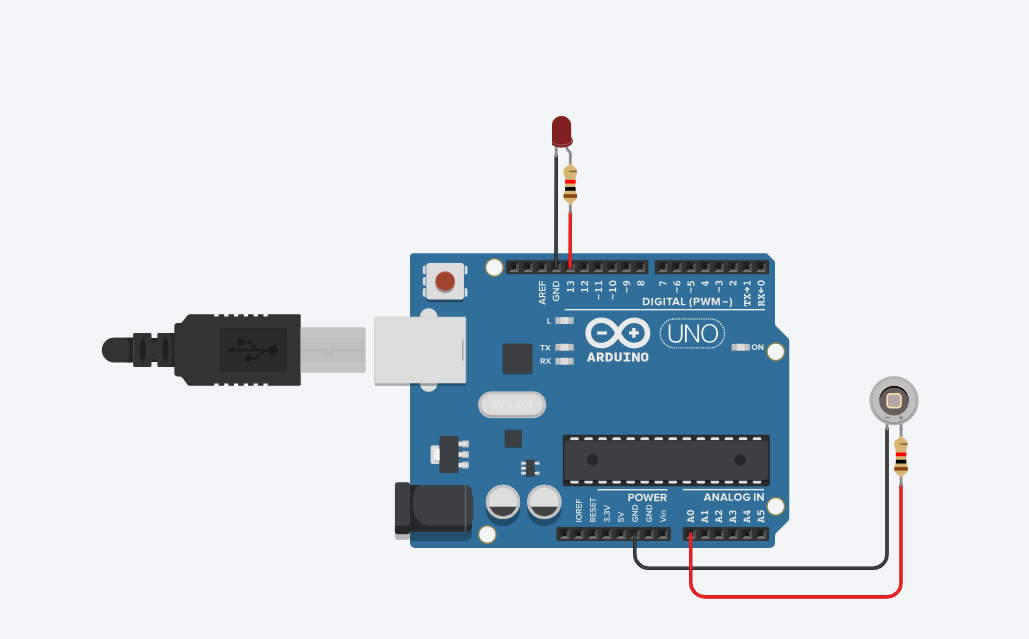
Circuit Diagram:
Photodiode Circuit:
- Connect the anode (positive) of the photodiode to the 5V pin of the Arduino.
- Connect the cathode (negative) of the photodiode to one end of a 10k-ohm resistor and to the Analog pin A0 of the Arduino.
- Connect the other end of the 10k-ohm resistor to the GND pin of the Arduino.
LED Circuit:
- Connect the anode (positive) of the LED to a digital pin (e.g., D9) on the Arduino through a 220-ohm resistor.
- Connect the cathode (negative) of the LED to the GND pin of the Arduino.
Solutionconst int photodiodePin = A0;
const int ledPin = 13;
int sensorValue = 0;
int threshold = 50; // Adjust this value based on your ambient light
unsigned long turnOnTime = 0;
unsigned long turnOffTime = 0;
void setup() {
pinMode(ledPin, OUTPUT);
Serial.begin(9600);
}
void loop() {
sensorValue = analogRead(photodiodePin);
Serial.println(sensorValue);
if (sensorValue < threshold) {
if (digitalRead(ledPin) == LOW) {
turnOnTime = millis();
Serial.print("LED turned on at: ");
Serial.println(turnOnTime);
}
digitalWrite(ledPin, HIGH); // Turn on the LED
} else {
if (digitalRead(ledPin) == HIGH) {
turnOffTime = millis();
Serial.print("LED turned off at: ");
Serial.println(turnOffTime);
}
digitalWrite(ledPin, LOW); // Turn off the LED
}
delay(100); // Delay for stability
}
OutputThreshold Adjustment:
- The threshold variable determines the light level at which the LED should turn on or off. You may need to adjust this value based on your specific environment.
Time Recording:
- turnOnTime and turnOffTime are used to record the time when the LED state changes.
- millis() function returns the number of milliseconds since the Arduino board began running the current program.
Serial Output:
- The Serial.print and Serial.println functions are used to output the times to the Serial Monitor for observation.
